The Appointment Editor allows you to schedule new appointments and view details for existing appointments. You can access the Appointment Editor from the Appointment Book or Resource Appointment Book as follows:
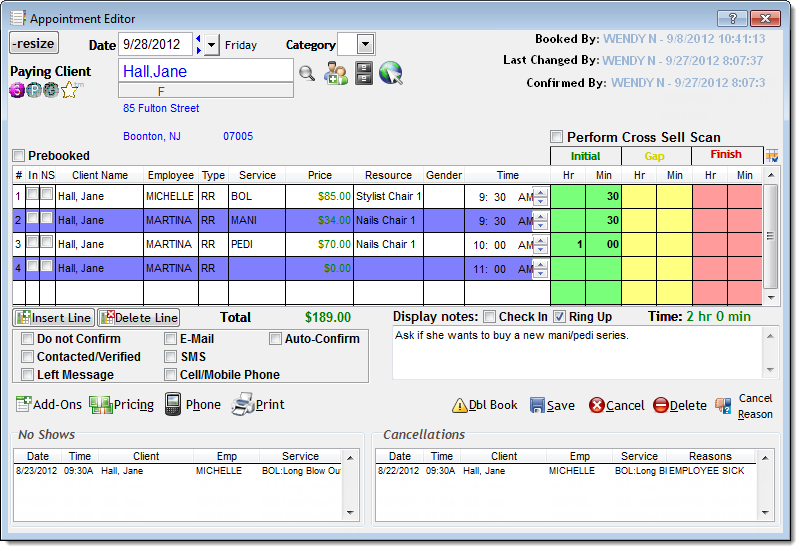
Example: Following is an example of the Appointment Editor for an existing appointment.
Following are descriptions of the features on the Appointment Editor.


The Client Information section displays details for the client entered in the Paying Client field.
Important: You must make an entry in the Paying Client field before you can schedule an appointment.
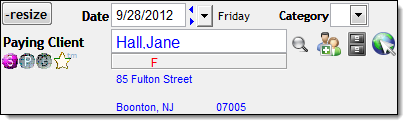
Complete the following in the Paying Client field to enter details for different types of clients.
Once you select a client, the following icons display to relay important information about the client.
Icon |
Description |
|
Client has earned the specified number of reward points. Double-click the gold star to view details on how the client earned the reward points. |
F |
Client is female. |
M |
Client is male. |
$ |
Client has a payment plan. Move the mouse pointer over the icon to view the amount owed and the number of payments left. |
$ |
Client owes money on account. Move the mouse pointer over the icon to view the amount owed. |
$ |
Client has an account credit. Move the mouse pointer over the icon to view the credit remaining. |
|
Client has a membership within the original membership term. Double-click to view details for the membership. |
|
Client has a membership within the first 90 days of the original membership term. |
|
Client has a "non-counting" membership that only offers discounts. |
|
Client has a membership due to expire within the next 30 days. |
|
Client has a membership renewed beyond the initial membership term. |
|
Client has an expired membership. |
|
Client has a frozen membership. |
|
Client has a suspended membership. |
|
Client has an active membership but the last dues payment did not process correctly. |
|
Client has an active membership with a termination date set in the future. |
|
Client has a driver's license on file. Double-click to view or edit the license details. |
|
Client has a credit card on file. Double-click to view or edit the card details. |
|
Client has a credit card on file but the card has expired. Double-click to view or edit the card details. |
|
Client is making their first visit. This icon displays until the client makes a purchase. |
|
Client has a series with at least one service remaining. Click to view details for the services remaining. |
|
Client has a package with at least one item remaining. Click to view details for the items remaining. |
|
Client has a gift certificate with credit remaining. Click to view the credit remaining. |
|
Client has a tanning package with at least one session remaining. Click to view the number of sessions remaining. |
|
Client has reward points available to redeem. Click to view details on how the client earned the reward points. |
The Action buttons allow you to transfer a client's name into the Paying Client field.
|
Button |
Description |
|
|
Click to display the Quick Search window so you can search for a client's profile by entering a partial name, telephone number, gift certificate number, or email address. |
|
|
Click to display the Client Information window so you can define a profile for a new client. |
|
|
Click to display the Client History window so you can view the transaction history for the client entered in the Paying Client field. |
|
|
Click to display the Central Office Client Information window so you can access the profile for a client registered at another location. This button only displays if you are using Central Office. |
The Date field displays the date selected for the appointment. If you want to move an appointment to another day, locate an available slot on the Appointment Book and change the date in this field to the new date.
The Category field allows you to assign an appointment category to the appointment. Appointment categories allow you to highlight the appointments for large groups on the Appointment Book, such as bridal parties.
Note: Click here for instructions on how to define an appointment category.
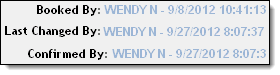
The Appointment Timestamps section displays the date and time when the appointment was booked, last updated, and confirmed. The name of the employee that performed the action also displays for reference.
The UpSell Choices section displays a list of upsell opportunities for the service currently being booked.
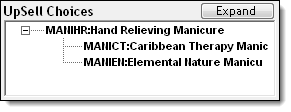
Note: The UpSell Choices section only displays if you are scheduling a service linked to upsell opportunities. You can link a service to upsell opportunities using the Up-Sell tab on the Service Definitions window.
The Services table allows you to enter details for the services the client wants to schedule. When you are viewing an existing appointment, the Services table displays the services currently scheduled.
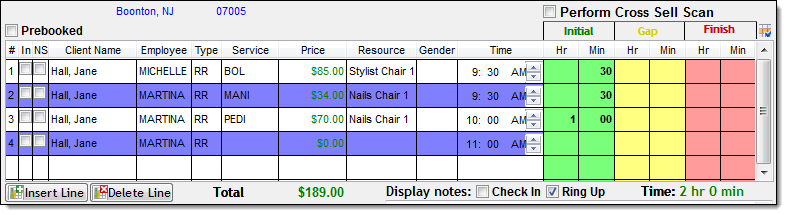
You must enter each service on a separate line and you can enter the services for multiple clients in the same appointment record if the clients want to schedule their services together.
Tip: When you select this option, a list of cross-selling opportunities displays when you attempt to save the appointment. You can define cross-selling opportunities for a service using the X-Sell tab on the Service Definitions window.
Time = Total time required to perform the services in the appointment.
The Confirmation Options section allows you to specify details about the appointment confirmation.

Following are descriptions of the options.
The Notes section allows you to enter instructions to display during check in and/or ring up.
![]()
Select the following options to specify when you want the notes to display.
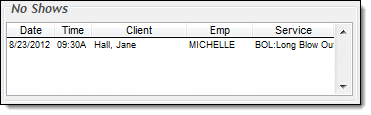
The No Shows section displays the date, time, service provider, and service for every appointment where the client was marked as a no-show.
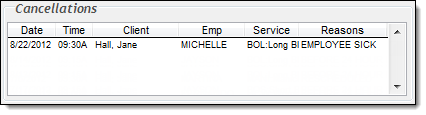
The Cancellations section displays the date, time, service provider, service, and cancellation reason for every appointment that the client has cancelled.
The action buttons on the Appointment Editor are used to change or update an appointment.
|
Button |
Description |
|
resize |
Click to minimize the Appointment Editor so that you can view the other windows that you have open in Millennium. |
|
Add-Ons |
Select a service and click Add-Ons to display the Service Add-on Selector window so you can select the add-on services the client wants to purchase. Note: This button only displays if you configured add-on services for the selected service. Click here for instructions on how to configure add-on services. |
|
Timing |
Click to display the Appointment Times window so you can view the client-specific appointment time and price for a service. |
|
Pricing |
Click to display the Service Price window so you can view the employee-specific prices for a service. |
|
Phone |
Click to display the Phone List window so you can view the contact telephone numbers for the client. |
|
|
Click to print a work ticket for the appointment. |
|
Dbl Book |
Click to double book another appointment at the same time as the appointment currently displayed on the Appointment Editor. |
|
Save |
Click to save the changes made to the appointment and close the Appointment Editor. |
|
Cancel |
Click to close the Appointment Editor without making any changes. |
|
Delete |
Click to cancel the appointment without selecting a cancellation reason. |
|
Cancel Reason |
Click to cancel the appointment by selecting a cancellation reason. |
related links
Resource Appointment Book Overview
© 2017 Millennium by Millennium Systems International. All rights reserved.