The Register allows you to ring up sales, process refunds, and adjust completed transactions.
Important: You must open the Register before you can ring up sales or process refunds. Click here for instructions.
You can access the Register by clicking ![]() on the toolbar or selecting Register > Ring-Up.
on the toolbar or selecting Register > Ring-Up.

The Register features two tabs.
The Register tab allows you to process everyday transactions such as sales and refunds.


The Client Information section displays details for the client entered in the Paying Client field.
Important: You must make an entry in the Paying Client field before you can start a new transaction.

Complete the following in the Paying Client field to enter details for different types of clients.
Once you enter a client's name in the Paying Client field, a number of notifications may display to relay important information about the client.
If the Notes window displays, review the notes carefully and click Ok.
If a notification displays indicating that information is missing from the client's profile, select to update the client's profile or select to continue without entering the missing information.
If the Anniversary Notice window displays, wish the client a happy wedding anniversary and click Close.
If the Birthday Notice window displays, wish the client a happy birthday and click Close.
If a notification displays indicating the client owes money on account, ask the client if they want to make an account payment and click Ok. Click here for instructions on how to ring up an account payment.
If a notification displays indicating the client has an account credit, ask the client if they want to use the credit as payment for this transaction and click Ok.
If the User Defined Fields window displays, review the information entered, make changes if necessary, and click Close.
If the Products Previously Purchased window displays, ask the client if they want to purchase any of the products listed. Select Buy It next to the desired products and click Ok. Click Cancel if the client does not want to purchase any of the products.
Once you have reviewed all of the notifications, the following icons display to relay important information about the client.
Icon |
Description |
|
Client has earned the specified number of reward points. Double-click the gold star to view details on how the client earned the reward points. |
F |
Client is female. |
M |
Client is male. |
$ |
Client has a payment plan. Move the mouse pointer over the icon to view the amount owed and the number of payments left. |
$ |
Client owes money on account. Move the mouse pointer over the icon to view the amount owed. |
$ |
Client has an account credit. Move the mouse pointer over the icon to view the credit remaining. |
|
Client has a membership within the original membership term. Double-click to view details for the membership. |
|
Client has a membership within the first 90 days of the original membership term. |
|
Client has a "non-counting" membership that only offers discounts. |
|
Client has a membership due to expire within the next 30 days. |
|
Client has a membership renewed beyond the initial membership term. |
|
Client has an expired membership. |
|
Client has a frozen membership. |
|
Client has a suspended membership. |
|
Client has an active membership but the last dues payment did not process correctly. |
|
Client has an active membership with a termination date set in the future. |
|
Client has a driver's license on file. Double-click to view or edit the license details. |
|
Client has a credit card on file. Double-click to view or edit the card details. |
|
Client has a credit card on file but the card has expired. Double-click to view or edit the card details. |
|
Client is making their first visit. This icon displays until the client makes a purchase. |
|
Client has a series with at least one service remaining. Click to view details for the services remaining. |
|
Client has a package with at least one item remaining. Click to view details for the items remaining. |
|
Client has a gift certificate with credit remaining. Click to view the credit remaining. |
|
Client has a tanning package with at least one session remaining. Click to view the number of sessions remaining. |
|
Client has reward points available to redeem. Click to view details on how the client earned the reward points. |
The Action buttons allow you to transfer a client's name into the Paying Client field.
|
Button |
Description |
|
|
Click to display the Quick Search window so you can search for a client's profile by entering a partial name, telephone number, gift certificate number, or email address. |
|
|
Click to display the Client Information window so you can define a profile for a new client. |
|
|
Click to display the Client History window so you can view the transaction history for the client entered in the Paying Client field. |
|
|
Click to display the Central Office Client Information window so you can access the profile for a client registered at another location. This button only displays if you are using Central Office. |
The Transaction Options section features options you can select to change the tax, receipts, and reward points for a transaction.
![]()
Following are descriptions of the options available.

The Line Item table allows you to enter details for the services the client received and/or the products the client is purchasing. When you ring up products and services together, you must enter each item on a separate line.
Tip: If you right-click on a client's appointment on the Appointment Book and select Ring-Up/Check-Out, the services they received display automatically in the Line Item table.

Following are descriptions of the fields.
Following are descriptions of the symbols that display in the Disc field.
$ = Dollar off discount.
% = Percentage off discount.
C = Coupon discount.
E = Employee price.
P = Package price (indicating the item is from a package/series).
S = Special price.
The Discount Options section features a number of buttons that allow you to apply a coupon/discount or redeem items from a package/series. Select a product or service to activate these buttons.

|
Button |
Description |
|
Delete Line |
Click to remove the selected line from the ticket. |
|
Undo Disc |
Click to remove the last discount applied to the selected line. |
|
Multi-Line Disc |
Click to display the Multi-Line Discount window so you can apply a coupon/discount to multiple lines on the ticket. |
|
Discount |
Click to display the Single Item Discount window so you can apply a coupon/discount to the selected line. |
|
Emp Price |
Click to change the price of the item on the selected line to the employee price. |
|
Use Pkg/Series |
Click to display the Pkg/Series Containing window so you can redeem an item from a package/series. |
|
Split Line |
Click to display the Split Line window so you can define a split commission for the selected item. |
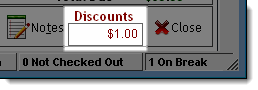
Once you apply a coupon or discount, the discount the client is receiving displays in the Discounts field in the bottom right corner of the Register.
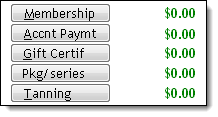
The Liabilities section features buttons that allow you to sell a membership, gift certificate, package, or series, or process an account payment.
|
Button |
Description |
|
Membership |
Click to display the Membership Sale window so you can sell the client a membership. |
|
Accnt Paymt |
Click to display the Account Payments window so you can process an account payment. |
|
Gift Certif |
Click to display the Gift Certificates window so you can sell the client a gift certificate. |
|
Pkg/series |
Click to display the Pkg/series Purchase window so you can sell the client a package/series. |
|
Tanning |
Click to display the Tanning Package Sale window so you can sell the client a tanning package. Note: This button only displays if you selected "YES" for the Show Tanning Button preference on the Business Information window. Click here for instructions on how to configure this preference. |
The Transaction Totals section displays grand totals for the items that the client is purchasing. If you are processing a refund, the refund amount displays in this section.
![]()
Following are descriptions of the fields in the Transaction Totals section.
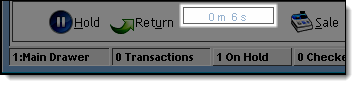
The action buttons on the Register allow you to finalize or change the status of a transaction.
|
Button |
Description |
|
Refund |
Click to display the Refunds window so you can process a refund. |
|
Hold |
Click to place the transaction on hold for completion later. |
|
Return |
Click to display the Clients ON HOLD window so you can reopen a transaction on hold. |
|
Sale |
Click to display the Payment Types window so you can collect payment and finalize the transaction. |
|
No Sale |
Click to cancel the current transaction and start a new transaction. |
|
Void |
Click to void the transaction and process a refund for the amount paid by the client. This button is only active if you have reopened a previous transaction from the Transaction Listing tab. |
|
Touch |
Click to open the Register Touch Screen Entry window so you can use the touch screen interface. |
|
Notes |
Click to open the Notes window so you can enter notes about the transaction. |
|
Close |
Click to close the Register without starting or completing a transaction. |
If you have the Show Timer in Register option selected in your user login record, a timer displays on the Register to show the time taken to complete the current transaction.
Tip: You can track the time taken to complete Register transactions using the Front Desk Productivity reports. Refer to the Reports User Guide for more information on the Front Desk Productivity reports.
The Status bar displays real-time statistics for transactions completed since you opened the Register.
![]()
|
Statistic |
Description |
|
Transactions |
Number of transactions completed since you opened the Register. |
|
On Hold |
Number of transactions placed on hold. Click this statistic to view details for the transactions on hold. |
|
Checked In |
Number of clients checked in for their appointment. Click this statistic to view details for the clients checked in. |
|
Running Late |
Number of clients more than 15 minutes late for their appointment. Click this statistic to view contact details for the clients running late. |
|
Due to Check In |
Number of clients with an appointment due to start within the next 15 minutes. Click this statistic to view details for the clients due to arrive. |
|
Not Checked Out |
Number of clients checked in for a time longer than their estimated appointment length but not checked out. Click this statistic to view details for the clients not checked out. |
|
On Break |
Number of employees punched out for a break. |
The Transaction Listing tab allows you to adjust completed transactions and reprint receipts.
The Search Filters section features search tools to locate transactions meeting specific criteria, such as the transactions during a specific date range.
![]()
Complete the following to locate a specific transaction.
Completed = Select to include completed transactions.
On Hold = Select to include transactions that were placed on hold.
Mail Order = Select to include mail order transactions.
Void = Select to include voided transactions.
Created By = Select an employee to only include the transactions performed by that employee or leave the field blank to include the transactions performed by all employees.
The Search Results section displays information for the transactions matching the criteria specified in the Search Filters section.

Following are descriptions of the fields.
Tip: This number uses the "YYYYMMDDNNNN" format, where "YYYY" is the year, "MM" is the month, "DD" is the day, and "NNNN" is a sequential number.
The Transaction Detail section displays information for the transaction selected in the Search Filters section.
![]()
Following are descriptions of the fields.
P = Product
K = Package or series
M = Membership
S = Service
T = Sales Tax
related links
© 2017 Millennium by Millennium Systems International. All rights reserved.