

-
Click
 on the toolbar.
The Register displays.
In the Paying Client field, type the client's name in "lastname,firstname" format and press Enter, or double-click in the field and locate the client's profile using the Quick Search window.
- Review any notifications that display and take action where necessary.
The client's details display.
- Click Gift Certif.
The Gift Certificates window displays.
- Complete the following:
-
If you use bar-coded gift cards, click in the Gift Certificate # field and swipe the card through the card reader. If you do not use bar-coded gift cards, type a number in the Gift Certificate # field or leave the field blank.
-
In the Purchased For field, type the name of the recipient in "lastname,firstname" format, or double-click in the field and locate the recipient's profile using the Quick Search window.
-
In the Sold By field, select the employee to credit with the sale.
-
In the Type field, select the type of gift certificate that the client wants to purchase.
-
In the Price field, type the amount to charge for the gift certificate.
-
In the Value field, type the redeemable value of the gift certificate.
-
In the How did the customer hear about this gift certificate field, select a referral type to indicate how the client heard about your business offering gift certificates.
- Complete the following as necessary:
-
-
In the Expiration field, select an expiration date.
-
-
-
In the Pre-Paid Tip field, type the amount of prepaid tip to sell with the gift certificate.
-
- Click Save.
Tip: If a notification displays asking if you want to assign a gift certificate number, click Yes.
- Click X .
- Click OK.
- Click Sale.
The Payment Types window displays.
- Collect payment for the balance due.
-
Complete one of the following:
If the client tenders the exact amount due, double-click the Cash icon.
If the client tenders more than the amount due, type the amount tendered and press Enter.
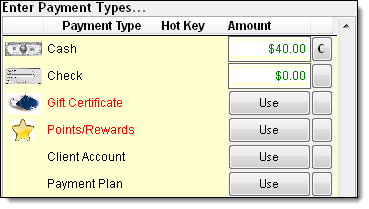
The cash drawer opens and the Change Due window displays.
Place the cash in the drawer and remove change if necessary.
Close the drawer.
Click Ok.
-
Important: You must configure the Credit Card Processing interface before you can process a credit/debit card payment. Click here for instructions.
Depending on how you configured the Credit Card Processing interface to process tips, different actions are required to process a credit/debit card payment.
Pre-Authorization Tipping
Click Process Credit Card.
The Credit Card Authorization window displays.
Complete the following to enter the client's card details:
Credit card = Click Use Card on File, swipe the client's card, or type the card details.
Debit card = Swipe the client's card. If you allow cash back, ask the client if they want to get cash back and type the desired amount in the Cash Back field.
Important: If you type a debit card number, Element will decline the payment.
Click Authorize.
If the client is paying with a debit card, ask the client to type their PIN on the PIN pad.
If the "Charge was approved" message displays, proceed to Step d.
If the "Connection Failed" message displays, click here for instructions.
If the "Declined" message displays, ask the client for an alternative form of payment.
Click OK.
The Charge/Credit Receipt window displays.
Complete the following:
Click Merchant Copy and click Print to print the payment authorization receipt. Present this receipt to the client so that they can authorize the payment.
If the client wants a copy of the payment authorization receipt, click Client Copy and click Print.
Click Close.
The Change Due window displays. If the client opted to get cash back on the transaction, the cash drawer opens so that you can give the client their cash back.
Click Ok.
Restaurant Style Tipping
Click Process Credit Card.
The Credit Card Authorization window displays.
Complete the following to enter the client's card details:
Credit card = Click Use Card on File, swipe the client's card, or type the card details.
Debit card = Swipe the client's card. If you allow cash back, ask the client if they want to get cash back and type the desired amount in the Cash Back field.
Important: If you type a debit card number, Element will decline the payment.
Click Authorize.
If the client is paying with a debit card, ask the client to type their PIN on the PIN pad.
If the "Charge was approved" message displays, proceed to Step d.
If the "Connection Failed" message displays, click here for instructions.
If the "Declined" message displays, ask the client for an alternative form of payment.
Click OK.
The Charge/Credit Receipt window displays.
Complete the following:
Click Merchant Copy and click Print to print the payment authorization receipt that needs to be signed by the client. Present this receipt to the client so that they can authorize the payment.
If the client wants a copy of the payment authorization receipt for their records, click Client Copy and click Print.
Click Close.
The Tip Amount window displays.
Click Ok.
The Change Due window displays. If the client opted to get cash back on the transaction, the cash drawer opens so that you can give the client their cash back.
Click Ok.
-
Click the
 button
next to Check.
button
next to Check.
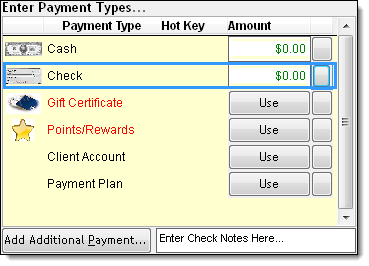
In the Enter Check Notes Here field, type the check number.
Double-click the Check icon.
The cash drawer opens and the Change Due window displays.
Place the check in the drawer.
Close the drawer.
Click Ok.
-
Click Use next to Points/Rewards.
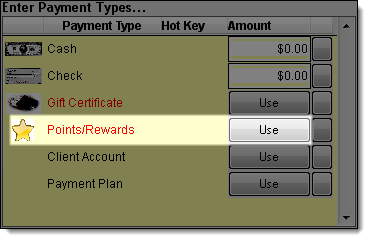
The Points/Rewards Redemption window displays.
Complete one of the following:
Redeem a specific amount of reward points = Type the value of reward points to redeem in the Value to Use field.
Redeem all of the reward points or redeem sufficient points to cover the balance due = Click Auto-Total.
The amended balance due displays in the New Balance field.
Click Ok.
If the Change Due window displays, click Ok to finalize the transaction.
If the Payment Types window displays, collect payment for the remaining balance due using another payment type.
-
Important: You must define account terms before a client can pay using an account charge. Click here for instructions.
Click Use next to Client Account.

The Account Charge window displays.
(Optional) In the Notes field, type notes about the account charge.
Click Ok.
The Change Due window displays.
Click Ok.
-
Click
on the toolbar.
The Register displays.
In the Paying Client field, type the client's name in "lastname,firstname" format and press Enter, or double-click in the field and locate the client's profile using the Quick Search window.
- Review any notifications that display and take action where necessary.
The client's details display.
- Click Gift Certif.
The Gift Certificates window displays.
- Click the Multi-Gift Certificate Wizard link in the Related Info panel.
The Multi-Gift Certificate Wizard displays.
- Complete the following:
-
In the How Many Gift Certificates field, select the number of gift certificates the client wants to purchase.
-
In the Beginning GC Number field, complete the following based on the scenario:
-
If you use bar-coded gift cards, gather the same number of gift cards entered in the How Many Gift Certificates field and make sure they have sequential numbers (e.g. 01, 02, 03, 04, and 05). Click in the Beginning GC Number field and swipe the card with the lowest bar code number (i.e. 01) through the reader.
-
If you do not use bar-coded gift cards, leave the field blank so that the numbers are automatically assigned or type the number at which to start the numbering (e.g. if you type "01" and are ringing up 5 gift certificates, the certificates will use the following numbers 01, 02, 03, 04, and 05).
-
In the Purchased For field, type the name of the recipient in "lastname,firstname" format, or double-click in the field and locate the recipient's profile using the Quick Search window.
-
In the Sold By field, select the employee to credit with the sale.
-
In the Type field, select the type of gift certificates that the client wants to purchase.
-
In the Price field, type the amount to charge for each gift certificate.
-
In the Value field, type the redeemable value of each gift certificate.
-
In the Multi-Gift Certificate Referral field, select a referral type to indicate how the client heard about your business offering gift certificates.
- Complete the following as necessary:
-
-
In the Expiration field, select an expiration date.
-
-
-
In the Pre-Paid Tip field, type the amount of prepaid tip to sell with the gift certificates.
-
- Click Ok.
- Click X .
- Click OK.
- Click Sale.
The Payment Types window displays.
- Collect payment for the balance due.
-
Complete one of the following:
If the client tenders the exact amount due, double-click the Cash icon.
If the client tenders more than the amount due, type the amount tendered and press Enter.
The cash drawer opens and the Change Due window displays.
Place the cash in the drawer and remove change if necessary.
Close the drawer.
Click Ok.
-
Important: You must configure the Credit Card Processing interface before you can process a credit/debit card payment. Click here for instructions.
Depending on how you configured the Credit Card Processing interface to process tips, different actions are required to process a credit/debit card payment.
Pre-Authorization Tipping
Click Process Credit Card.
The Credit Card Authorization window displays.
Complete the following to enter the client's card details:
Credit card = Click Use Card on File, swipe the client's card, or type the card details.
Debit card = Swipe the client's card. If you allow cash back, ask the client if they want to get cash back and type the desired amount in the Cash Back field.
Important: If you type a debit card number, Element will decline the payment.
Click Authorize.
If the client is paying with a debit card, ask the client to type their PIN on the PIN pad.
If the "Charge was approved" message displays, proceed to Step d.
If the "Connection Failed" message displays, click here for instructions.
If the "Declined" message displays, ask the client for an alternative form of payment.
Click OK.
The Charge/Credit Receipt window displays.
Complete the following:
Click Merchant Copy and click Print to print the payment authorization receipt. Present this receipt to the client so that they can authorize the payment.
If the client wants a copy of the payment authorization receipt, click Client Copy and click Print.
Click Close.
The Change Due window displays. If the client opted to get cash back on the transaction, the cash drawer opens so that you can give the client their cash back.
Click Ok.
Restaurant Style Tipping
Click Process Credit Card.
The Credit Card Authorization window displays.
Complete the following to enter the client's card details:
Credit card = Click Use Card on File, swipe the client's card, or type the card details.
Debit card = Swipe the client's card. If you allow cash back, ask the client if they want to get cash back and type the desired amount in the Cash Back field.
Important: If you type a debit card number, Element will decline the payment.
Click Authorize.
If the client is paying with a debit card, ask the client to type their PIN on the PIN pad.
If the "Charge was approved" message displays, proceed to Step d.
If the "Connection Failed" message displays, click here for instructions.
If the "Declined" message displays, ask the client for an alternative form of payment.
Click OK.
The Charge/Credit Receipt window displays.
Complete the following:
Click Merchant Copy and click Print to print the payment authorization receipt that needs to be signed by the client. Present this receipt to the client so that they can authorize the payment.
If the client wants a copy of the payment authorization receipt for their records, click Client Copy and click Print.
Click Close.
The Tip Amount window displays.
Click Ok.
The Change Due window displays. If the client opted to get cash back on the transaction, the cash drawer opens so that you can give the client their cash back.
Click Ok.
-
Click the
button
next to Check.
In the Enter Check Notes Here field, type the check number.
Double-click the Check icon.
The cash drawer opens and the Change Due window displays.
Place the check in the drawer.
Close the drawer.
Click Ok.
-
Click Use next to Points/Rewards.
The Points/Rewards Redemption window displays.
Complete one of the following:
Redeem a specific amount of reward points = Type the value of reward points to redeem in the Value to Use field.
Redeem all of the reward points or redeem sufficient points to cover the balance due = Click Auto-Total.
The amended balance due displays in the New Balance field.
Click Ok.
If the Change Due window displays, click Ok to finalize the transaction.
If the Payment Types window displays, collect payment for the remaining balance due using another payment type.
-
Important: You must define account terms before a client can pay using an account charge. Click here for instructions.
Click Use next to Client Account.
The Account Charge window displays.
(Optional) In the Notes field, type notes about the account charge.
Click Ok.
The Change Due window displays.
Click Ok.