Windows Server 2003 / Windows Small Business Server 2003 (32-bit)

-
Select one of the following options:
-
If you do not have the IIS component installed, proceed to Step 2.
-
If you have the IIS component installed, proceed to Step 12.
-
Press Windows Logo+R or select Start > All Programs > Accessories > Run.
The Run window displays.
-
Type "appwiz.cpl" and press Enter.
The Add or Remove Programs window displays.
-
Click Add/Remove Windows Components.
The Windows Components Wizard displays.
-
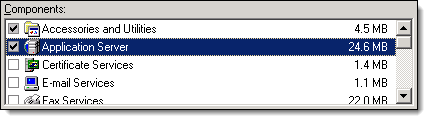
Select Application Server and click Details.
The Application Server window displays.
-
Select the following and click Details.
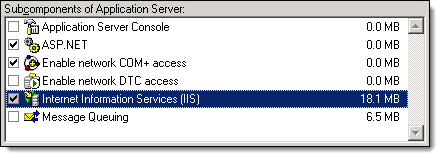
The Internet Information Services (IIS) window displays.
-
Select World Wide Web Service and click Details.
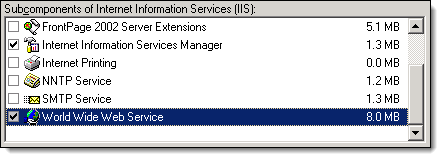
The World Wide Web Service window displays.
-
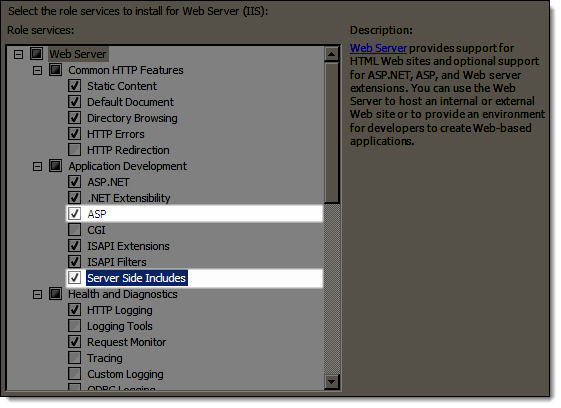
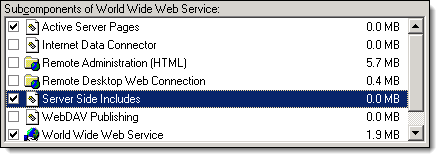
Select Active Server Pages and Server Side Includes.
-
Click OK until the Windows Components Wizard displays.
-
Click Next.
The Completing the Windows Components Wizard screen displays once the installation finishes.
-
Click Finish.
-
Select one of the following options:
-
If you have Windows Server Update Services (WSUS) installed, proceed to Step 13.
-
If you do not have Windows Server Update Services (WSUS) installed, proceed to Step 16.
-
Press Windows Logo+R or select Start > All Programs > Accessories > Run.
The Run window displays.
-
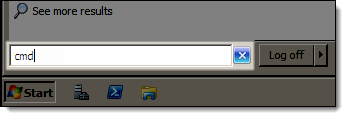
Type "cmd" and press Enter.
The Command Prompt displays.
-
Type "%windir%\system32\inetsrv\appcmd.exe set config -section:system.webServer/httpCompression" and press Enter.
-
Restart the computer and access Windows with an administrator account.
-
Click here to proceed with the next step of the setup.
-
Select one of the following options:
-
If you do not have the IIS component installed, proceed to Step 2.
-
If you have the IIS component installed, proceed to Step 12.
-
Press Windows Logo+R or select Start > All Programs > Accessories > Run.
The Run window displays.
-
Type "appwiz.cpl" and press Enter.
The Add or Remove Programs window displays.
-
Click Add/Remove Windows Components.
The Windows Components Wizard displays.
-
Select Application Server and click Details.
The Application Server window displays.
-
Select the following and click Details.
The Internet Information Services (IIS) window displays.
-
Select World Wide Web Service and click Details.
The World Wide Web Service window displays.
-
Select Active Server Pages and Server Side Includes.
-
Click OK until the Windows Components Wizard displays.
-
Click Next.
The Completing the Windows Components Wizard screen displays once the installation finishes.
-
Click Finish.
-
Press Windows Logo+R or select Start > All Programs > Accessories > Run.
The Run window displays.
-
Type "cmd" and press Enter.
The Command Prompt displays.
-
Type "cscript %SYSTEMDRIVE%\inetpub\adminscripts\adsutil.vbs SET W3SVC/AppPools/Enable32bitAppOnWin64 1" and press Enter.
-
Type "%SYSTEMROOT%\Microsoft.NET\Framework\v2.0.50727\aspnet_regiis.exe -i" and press Enter.
-
Select one of the following options:
-
If you have Windows Server Update Services (WSUS) installed, proceed to Step 17.
-
If you do not have Windows Server Update Services (WSUS) installed, proceed to Step 18.
-
Type "%windir%\system32\inetsrv\appcmd.exe set config -section:system.webServer/httpCompression" and press Enter.
-
Restart the computer and access Windows with an administrator account.
-
Click here to proceed with the next step of the setup.