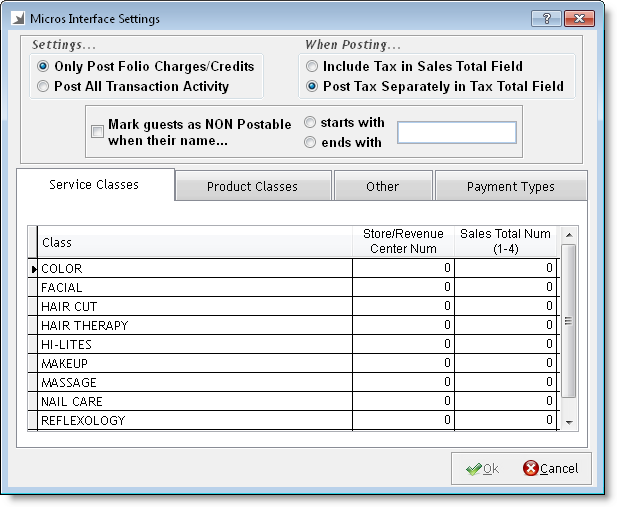
The next step is to configure settings for the MICROS interface in Millennium.
Note: You need to obtain a copy of the POS/SPA Interface Workbook form to complete this step. Contact NORTHWIND for more information on how to obtain this form.
Access Millennium with an administrator account.
Select Data > Business Information and Preferences.
The Business Information window displays.
The Micros Interface Settings window displays.
In the Settings section, select one of the following options to determine the level of transactional detail transferred from Millennium to Maestro:
Select Only Post Folio Charges/Credits to transfer details of charges and credits.
Select Post All Transaction Activity to transfer details of all transactions.
In the When Posting section, select one of the following options:
Select Include Tax in Sales Total Field to add the sales tax for a transaction to the amount displayed in the Sales Total field in Maestro.
Select Post Tax Separately in Tax Total Field to display the sales tax for a transaction in the Tax Total field in Maestro.
Select Mark guests as NON Postable when their name to give employees the ability to prevent guests from posting charges. Select a keyword to use for preventing clients from posting charges and select starts with or ends with to determine where you must type the keyword next to the guest's name.
Example: If you select ends with and type "*CASH" as the keyword, you can type "*CASH" after a guest's name to prevent them from posting charges.
 and complete the following:
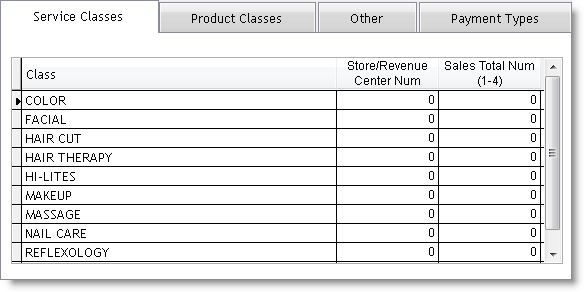
In the Store/Revenue Center Num fields, type the revenue center number for each service class. Multiple service classes can use the same revenue center number (for instance, the Facial and Makeup service classes could use the same revenue center number), or you can associate each service class with a separate revenue center number.
In the Sales Total Num (1-4) fields, type the sales category number for each service class.
More Info: Contact NORTHWIND for more information on the correct revenue center and sales category numbers to use for each service class.
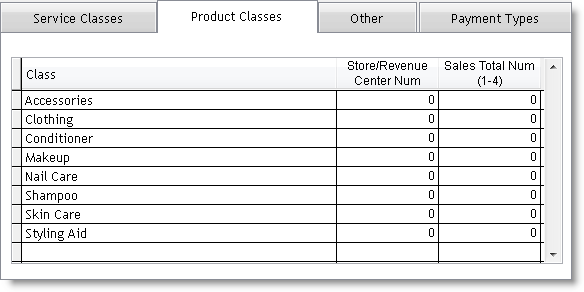
and complete the following:
In the Store/Revenue Center Num fields, type the revenue center number for each product class. Multiple product classes can use the same revenue center number (for instance, the Conditioner and Shampoo product classes could use the same revenue center number), or you can associate each product class with a separate revenue center number.
In the Sales Total Num (1-4) fields, type the sales category number for each product class.
More Info: Contact NORTHWIND for more information on the correct revenue center and sales category numbers to use for each product class.
and complete the following:
In the Store/Revenue Center Num fields, type the revenue center number for each item. Multiple items can use the same revenue center number (for instance, Membership and Package/Series could use the same revenue center number), or you can associate each item with a separate revenue center number.
In the Sales Total Num (1-4) fields, type the sales category number for each item.
More Info: Contact NORTHWIND for more information on the correct revenue center and sales category numbers to use for each item.
and complete the following:
In the Payment Number fields, type the payment number to associate with each payment type. Multiple payment types can use the same payment number (for instance, all credit card types could use the same payment number), or you can associate each payment type to a unique payment number.
In the NonMapped Payment Type Number field, type a payment number to use for non-mapped payment types.
More Info: Contact NORTHWIND for more information on the correct payment number to use for each payment type.
The Millennium Intelli-Text Control window displays.
Type "PMS00M" in the OR type a report number here field and click Ok.
The Reports & Graphs window displays.
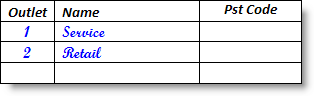
In the Outlet field, type the revenue center number.
In the Name field, type the name of the revenue center.
Example: The following example shows the Service and Retail entered on the form.
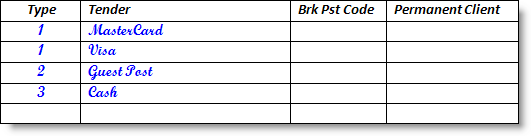
In the Type field, type the payment number assigned to the payment type.
In the Tender field, type the name of the payment type.
Example: The following example shows the entries required for two payment numbers and their associated payment types.

If you have a payment number associated with multiple payment types (such as Visa and Master Card), you must enter the payment types as follows.
Example: The following example shows the entries required if you use two revenue centers and have two payment types associated to each revenue center.

Complete the remaining fields on the form using NORTHWIND's guidelines and submit the form to NORTHWIND once complete.
Click here to proceed with the next step of the setup.
6. Configure Security Settings